

Most AI agents wait to be asked. Sensors flip that — a tiny script that watches one condition on a loop, inside your agent’s own container, and pings your agent the moment something actually changes.
A lot of useful work in a business is that shape: watch this, and tell me when it changes. New orders. A price. A server. A car cooling down. One of our users recently told their agent to watch their Tesla’s cabin temperature and ping them when it cooled — then, over a single chat, turned it into a full thermostat that switches the AC on and off by itself. We’ll get there. First, let’s build one.
What a sensor actually is
Three parts. A script you (or your agent) write at workspace/sensors/<name>.py that checks one thing and prints a single line of JSON. A loop the platform runs for you — every interval_seconds (minimum 10) — executing that script in the agent’s sandbox, with no model call per tick, so it’s effectively free to run. And a delivery that fires only when the condition trips.
The whole contract your script prints is just {"condition_met": true, "message": "…", "data": {…}}. That’s it.
You don’t need to read any of the code below to use sensors. The steps that follow show what’s happening under the hood — handy if you’re technical or want to hand-tune one. The everyday way to make a sensor is simply to ask: tell your agent something like “watch X and tell me when Y” and it writes the script, picks the trigger, and wires up the delivery for you. The Tesla thermostat further down was built exactly that way — entirely by chat, with no human touching code.
Step 1 — Open the Sensors tab
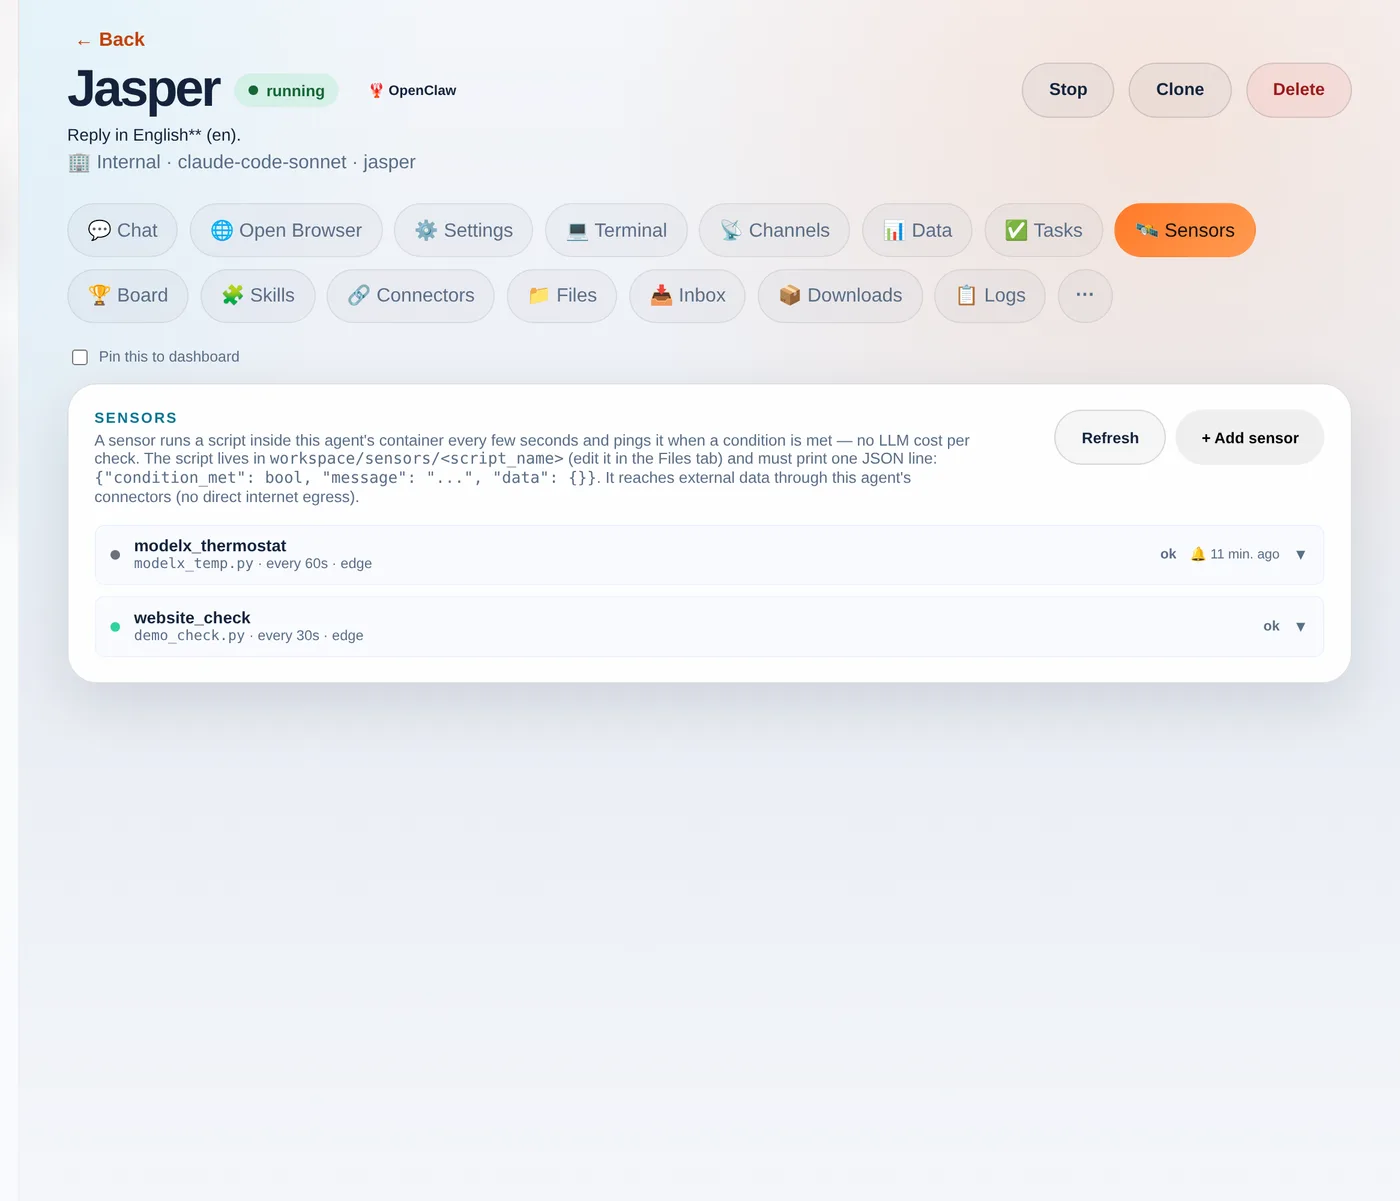
Open any agent and go to the 🛰️ Sensors tab. You’ll see the contract, a + Add sensor button, and any existing sensors with their last status.
Step 2 — Write the script
In the Files tab, create a file under sensors/ — say demo_check.py — that prints the JSON contract. Here’s a self-contained example you can paste as-is:
import json, os

# Sensors hand the previous run's "data" back as $SENSOR_PREV_DATA, so a sensor
# can compare against last time. This demo just counts runs.
prev  = json.loads(os.environ.get("SENSOR_PREV_DATA", "{}"))
count = prev.get("count", 0) + 1

print(json.dumps({
    "condition_met": count >= 1,            # <-- your real check goes here
    "message": f"Demo check #{count}: all good",
    "data": {"count": count},
}))
The platform hands your script a couple of things for free as environment variables: $SENSOR_PREV_DATA (the previous run’s data, so you can diff against last time) and credentials to call your agent’s connectors.
Step 3 — Add the sensor
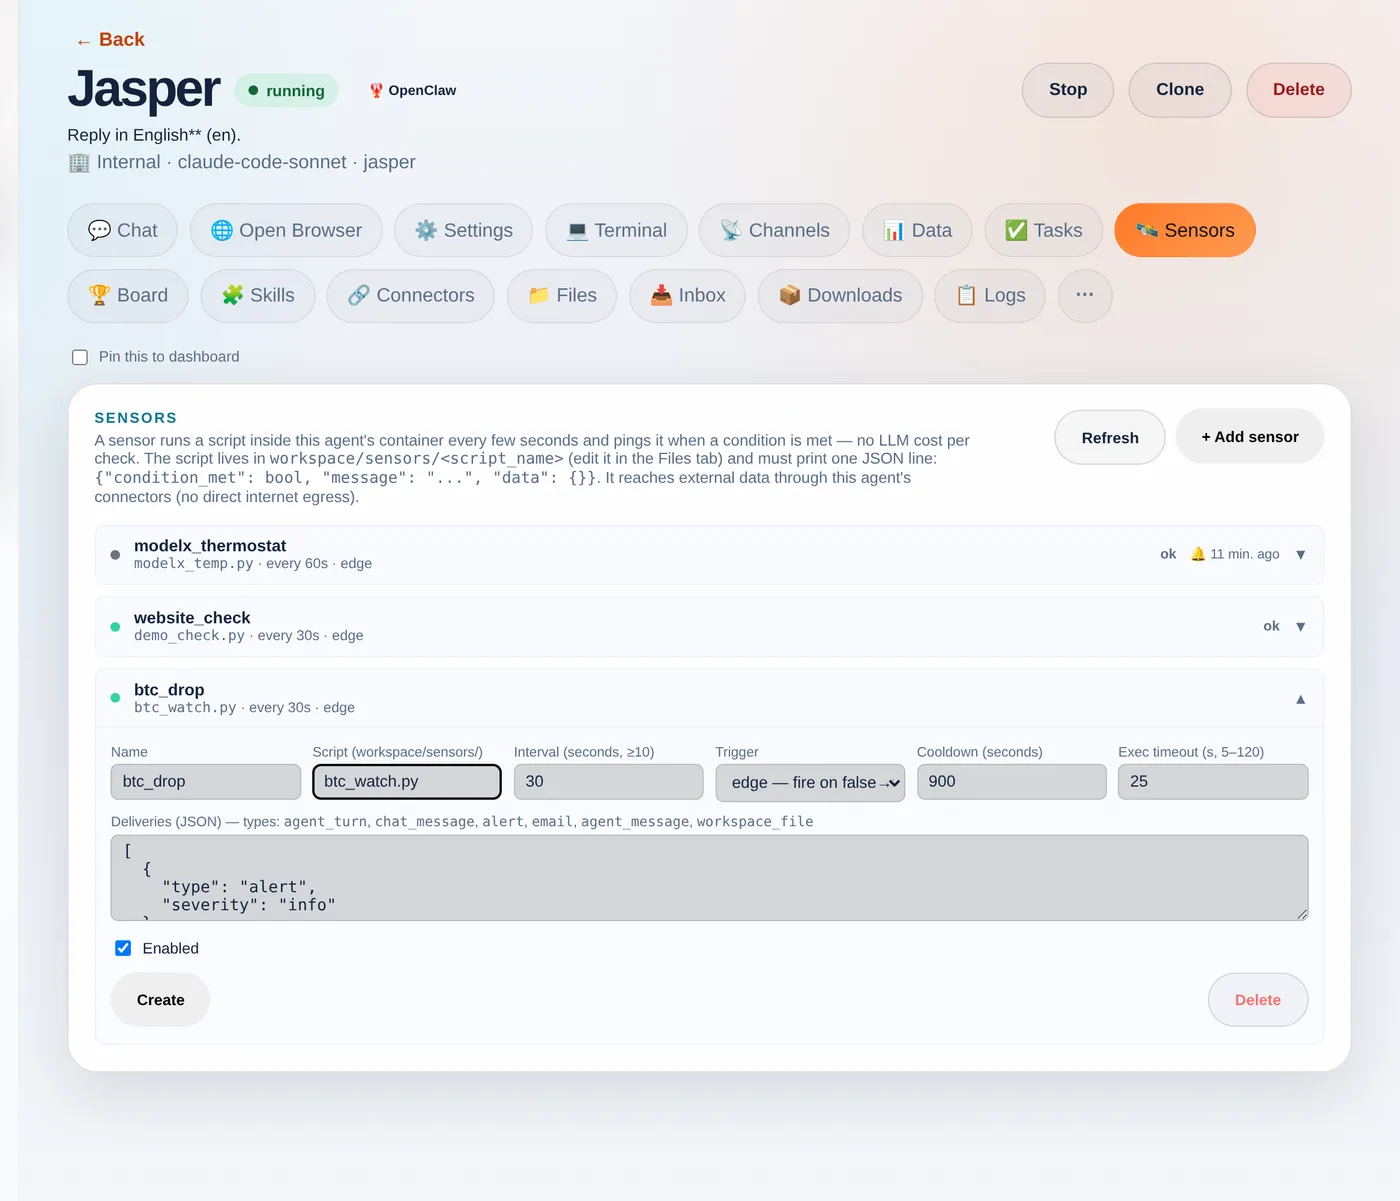
Back on the Sensors tab, click + Add sensor and fill in the form: a name, the script filename, how often to run, and the trigger.
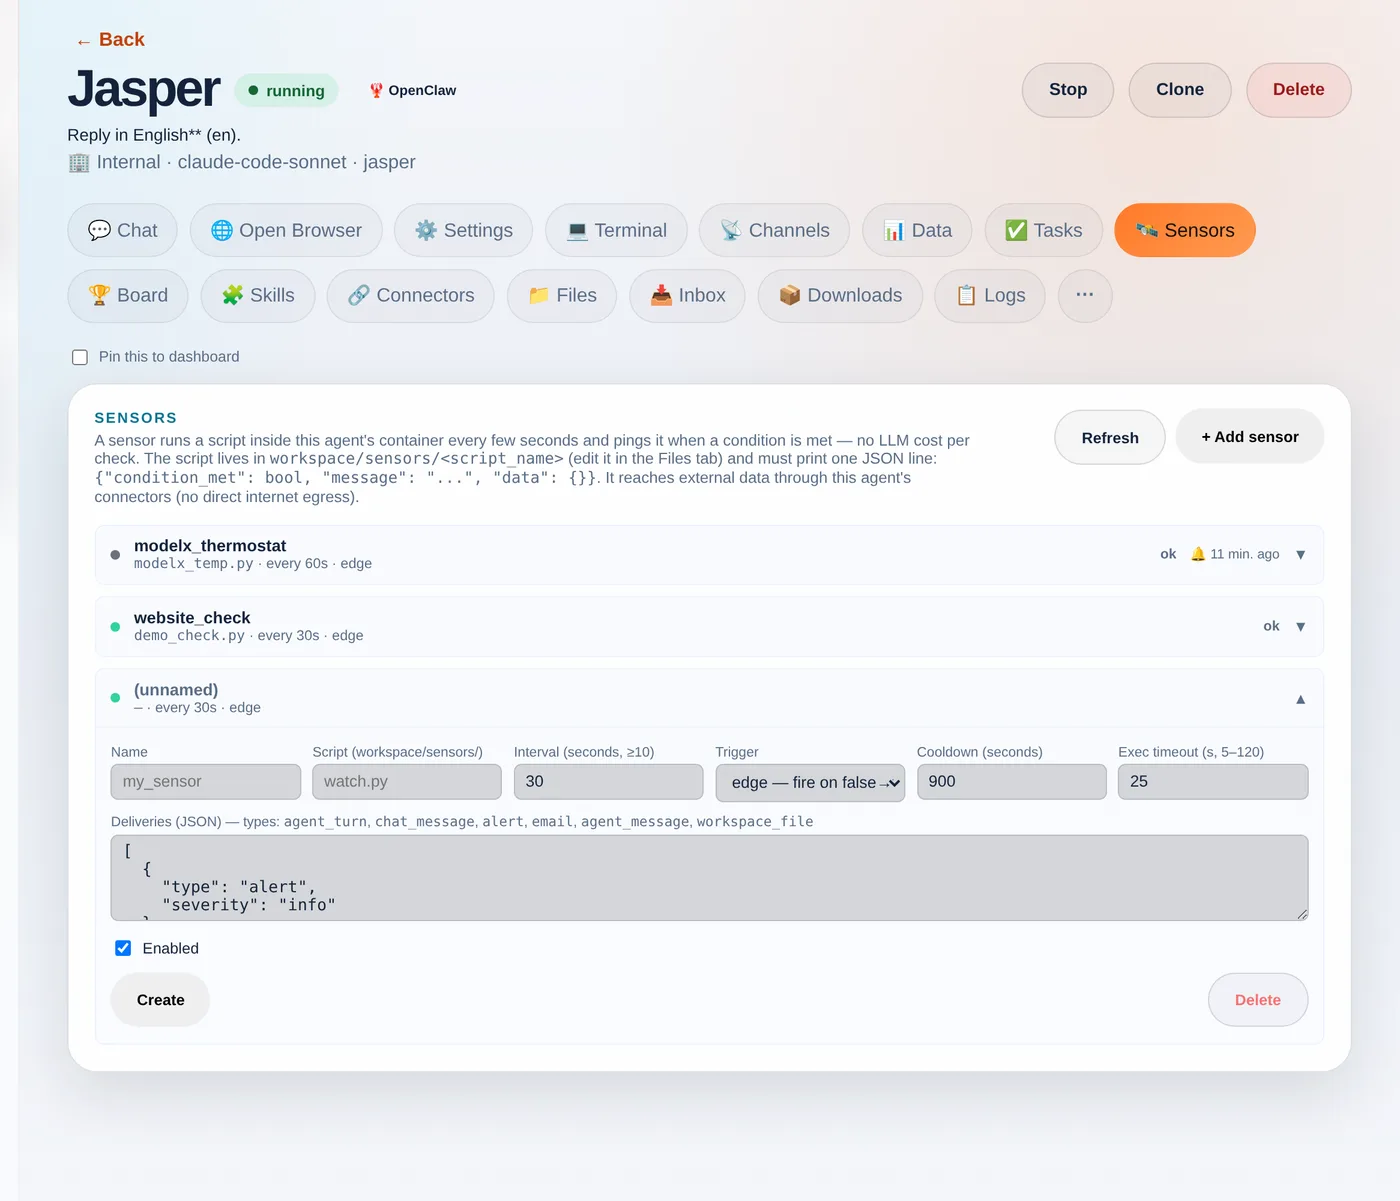
- Trigger —
edgefires once when the condition flips false→true (best for “tell me when X happens”);levelfires on every true tick;changefires whenever thedatachanges. - Cooldown — the minimum gap between pings, so a condition that stays true doesn’t spam you.
- Deliveries — an
alert, anemail, achat_messagestraight into the chat, a writtenworkspace_file, or anagent_turnthat wakes the agent to act.
Step 4 — Test before you trust
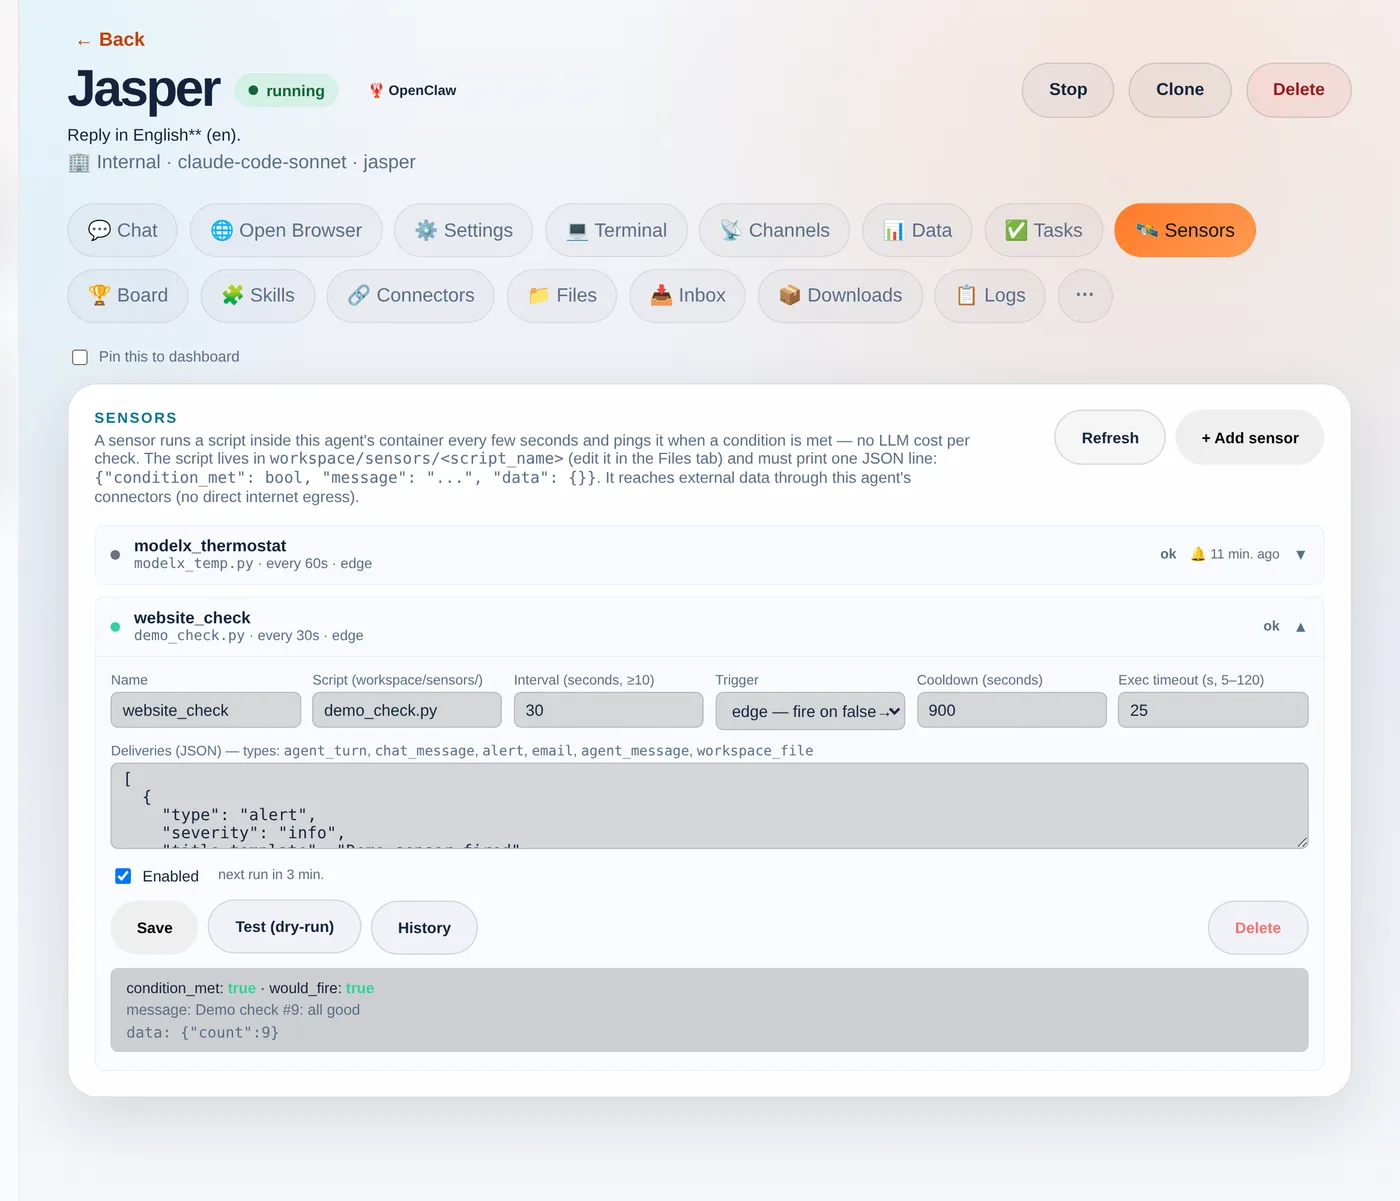
Hit Test (dry-run). It runs your script once, now, and shows exactly what it returned — condition_met, whether it would fire, the message and the data — without changing anything or sending a delivery. The fastest way to iterate until it’s right.
Step 5 — Watch it run
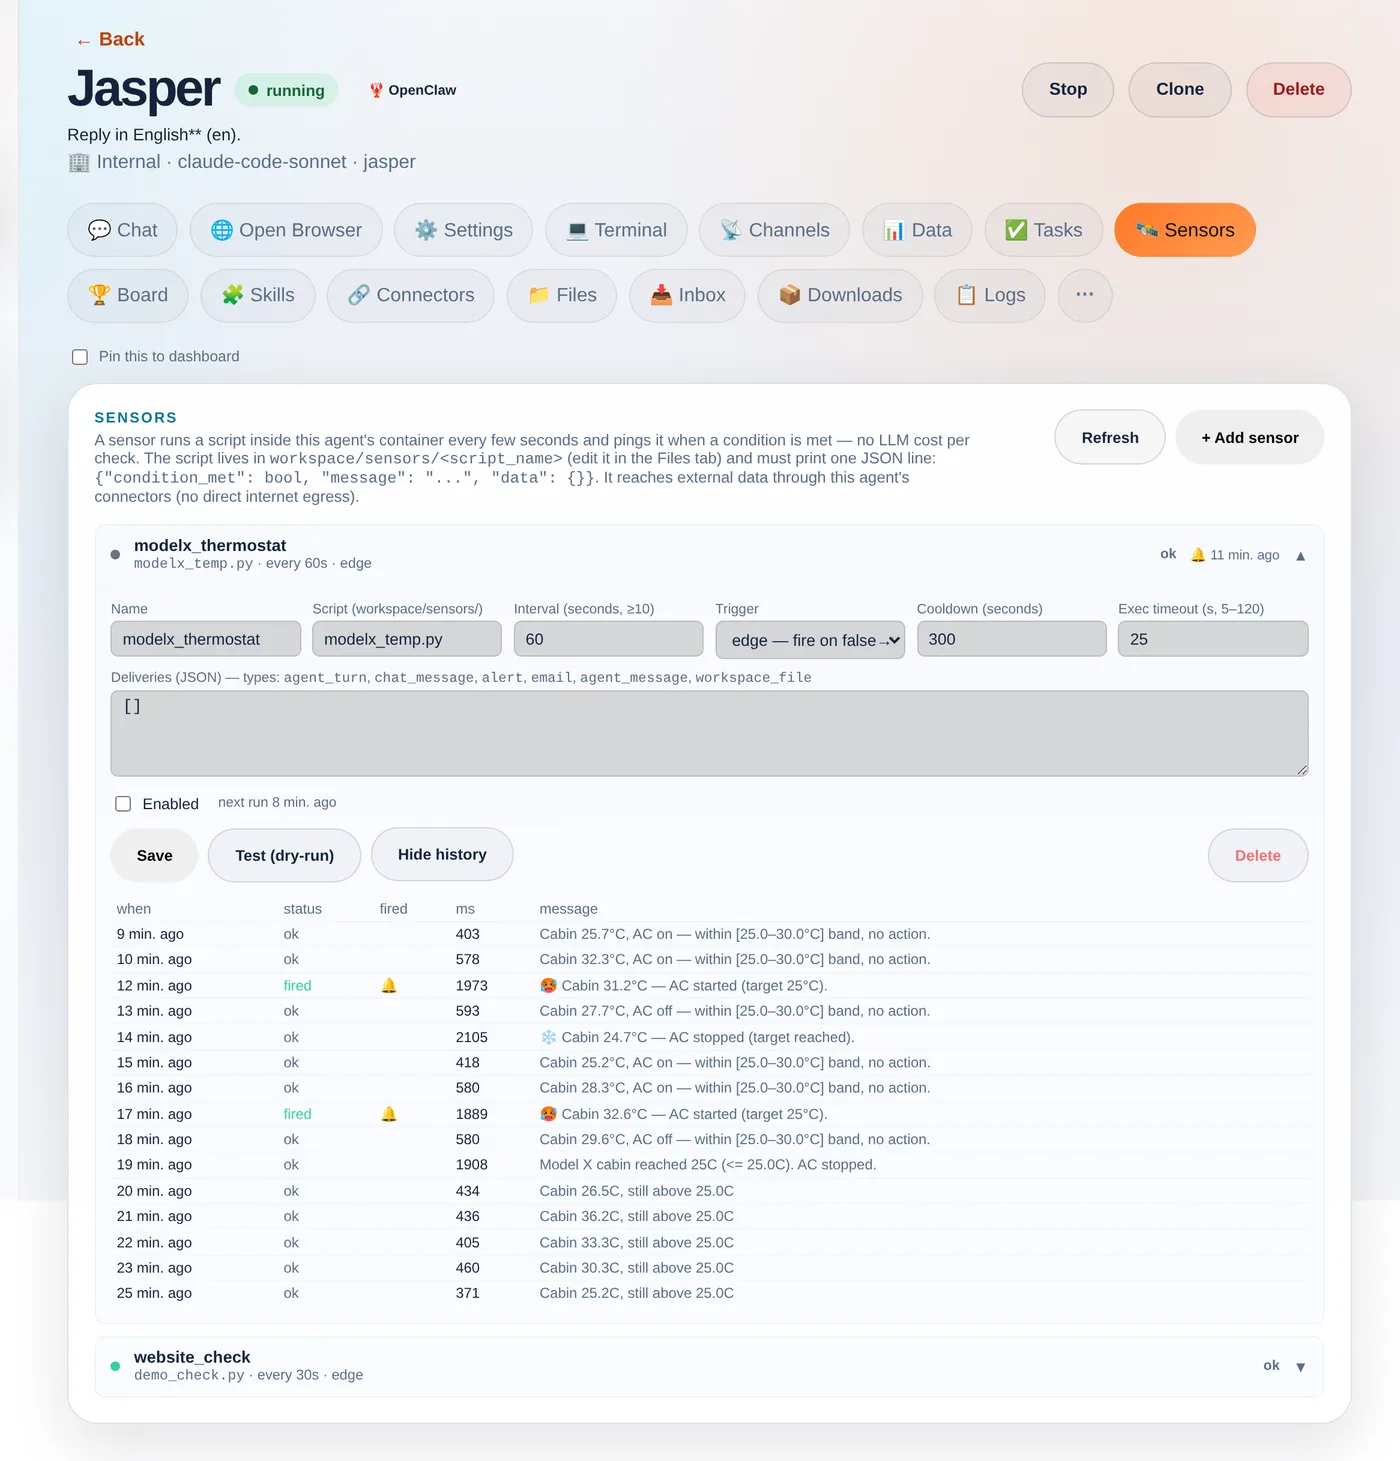
Once saved, the sensor runs on its loop. Click History to see every recent run: its status, whether it fired, how long the script took, and the message it printed. This is where “cheap to watch, only act on an edge” becomes visible.
The Tesla that built its own thermostat
Which brings us back to the car. The user asked their agent to set the Model X to 25° and tell them when it reached it. The agent wrote a sensor that polls the car through the tessie connector every 60 seconds. The cabin was baking at 51°C; eleven minutes later, on its own:
🛰️ Model X cabin reached 24.1°C (target 25.0°C)
Then they kept going — fire when it goes above 30°, turn the AC off when it hits 25°, and finally “bounce between 30 and 25 indefinitely.” The agent rewrote the sensor each time until it was a genuine thermostat: cabin ≥ 30°C → start the AC; ≤ 25°C → stop it; in between → nothing. The history above is that exact sensor. And notice: the control loop runs as plain code — the model was only involved while authoring it by chat. That’s the whole idea: natural language to write the automation, cheap deterministic code to run it. Your script reaches real data through your agent’s connectors — any REST API, your store, your CRM, or a car:
import json, os, urllib.request

def connector_get(slug, path):
    req = urllib.request.Request(
        f"{os.environ['INTERNAL_BASE_URL']}/api/internal/connectors/{slug}{path}",
        headers={
            "X-Internal-Secret": os.environ["ORCHESTRATOR_SECRET"],  # injected per agent
            "X-Company-Id":      os.environ["COMPANY_ID"],
            "X-Agent-Slug":      os.environ["AGENT_SLUG"],
        })
    return json.load(urllib.request.urlopen(req, timeout=15))

# Read a Tesla's cabin temperature through the Tessie connector
state  = connector_get("tessie", "/<VIN>/state?use_cache=false")
inside = state["climate_state"]["inside_temp"]

print(json.dumps({
    "condition_met": inside <= 25.0,
    "message": f"Cabin {inside}°C (target 25°C)",
    "data": {"inside_temp": inside},
}))
How Agentura sensors are different
Most automation and “AI agent” platforms hand you a fixed menu: a time trigger, a webhook trigger, and a no-code condition builder where you pick a field and an operator. That’s neat — until the thing you want to watch doesn’t fit the menu. The nearest relatives in spirit are Apache Airflow’s sensors (poll until a condition is met) and the newer idea of “ambient agents” (agents woken by events instead of prompts) — but those are still scaffolding a developer wires up by hand.
Here, your agent writes the sensor itself, as real, bespoke code — generated on the spot for exactly what you asked. There’s no fixed list of supported conditions to choose from: describe it in plain language and the agent can chain several API calls, compute a rolling average, join two data sources, diff against the last run, decide, and act. Because it’s genuine code running against your connectors, the ceiling is whatever code and your integrations can do — in practice, the sky’s the limit, not whatever some settings form happened to anticipate. And it stays cheap: the loop is plain code with no model call per tick, so you can watch something every few seconds without spending tokens — the AI only steps in to build or change a sensor, or when a trip is set to wake it to act.
A few rules of thumb
- Default to
edge+ a cooldown — the difference between “tell me when it hits 25°” and a ping every 60 seconds while it sits there. - Checks are free; actions aren’t. Polling and conditions are plain code. Only
agent_turnspends a model call — gate it behind the trigger. - Minimum interval is 10 seconds, and Test (dry-run) until the JSON is right before you let it loose.
Sensors give your agents something most assistants lack: a sense of their surroundings, and the initiative to act on it. Point one at whatever you keep checking by hand and let it watch, so you don’t have to.